Cast Iron Pan Pizza
Cast Iron Pan Pizza is the ultimate fun food for camping, an evening outdoors, or when entertaining friends. This pan pizza recipe will result in a crispy bottom, golden brown cheesy edges, and a puffy rise. And with all those toppings, it’s just a perfect cast iron pan pizza recipe.
This recipe, like my Spicy Chorizo Shrimp Pizza, uses my Perfect All-Purpose Pizza Dough. My pizza dough recipe is good for multiple, home baking scenarios, like a Cast Iron Pan Pizza, oven, and outdoor grills. It works out beautifully for this pan-pizza recipe.
Table of contents
Why you will love this Cast Iron Pizza recipe
If you like to camp, head to a cool house rental in the desert or mountains, nothing beats a fun pizza night. This cast iron skillet pizza can be baked in the oven and on the grill. Both methods yield an amazingly delicious pizza. My cast iron pan is older than old so I have no issue throwing it in the trunk of the car for baking pizza away from home. If you choose to buy premade pizza dough, just ensure it’s refrigerated and follow the instructions as you would if you made the dough. I do, however, recommend making homemade dough. If you make my recipe, it will yield 3 cast iron pizzas using a 10-inch cast iron skillet. If you decide to make my Perfect All-Purpose Pizza Dough, you will need a 2-hour rise before baking.
Ingredients for Cast Iron Pan Pizza
- 1 Pizza dough ball – homemade Perfect All Purpose Pizza Dough Recipe or store-bought, refrigerated pizza dough.
- 1/2 cup of pizza sauce, store-bought or my Rich and Zesty pizza sauce.
- 1 1/2 cups of mozzarella cheese
- 3-6 ounces of sliced pepperoni
- olive oil to brush onto dough + olive oil to brush onto pan (about 2 tablespoons)
- 1/2 teaspoon of Italian seasoning (optional)
- Additional toppings of your choice – cooked Italian sausage, thinly sliced, sautéed peppers, onions, sliced olives, mushrooms etc.
- Parmesan cheese, grated for serving
- Crushed red pepper flakes for serving
Pizza dough tips
I make pizza kits for camping or our home-away rentals so I have the right amount of dough, pizza sauce, and cheese per pizza. From there, I take a variety of toppings so everyone can customize their pizza. In addition, you can make this pizza dough in advance, portion it and freeze it for the weekend. It freezes beautifully and the defrost is quick and easy.
These pizzas cook in about 10-12 minutes, so it’s a pretty quick lunch or dinner. Just add a nice Butter Lettuce Green Salad and a nice bottle of wine, and dinner is served.
How to prepare dough for this pan pizza
Once you have either made your homemade dough (see note below) or purchased prepared dough, (like Trader Joe’s refrigerated dough) it’s time for a stretch.
If the dough is refrigerated, allow the dough to come to room temperature before stretching the dough. Dust the work surface with a little flour to prevent the dough from sticking. In terms of size, If you are using a 10-inch skillet, you will want to stretch the dough to a circle slightly larger than the bottom of the pan. The dough should be an 11-inch circle.
Don’t worry if the circle isn’t perfect, once it’s placed in the pan and baked it will be fine. For this cast iron pan pizza you will not need cornmeal to dust a pizza peel as the dough will go directly into a heated, oiled pan.
NOTE: If you are using my pizza dough recipe, you will need 1/3 of the dough per pan pizza.
How to prep the cast iron pan to bake pizza
For the best results, preheat the grill or oven to 500 degrees Fahrenheit. Once the oven is preheated, place the empty cast iron pan in the middle rack or grill and preheat for 10 minutes. Using an oven-safe mitt, carefully remove the preheated cast iron pan and carefully brush olive oil on the bottom and sides of the skillet.
How to bake Cast Iron Pan Pizza
Now carefully place the dough circle in the pan and carefully push the dough to the edges if needed to even it out the dough on the bottom of the skillet.
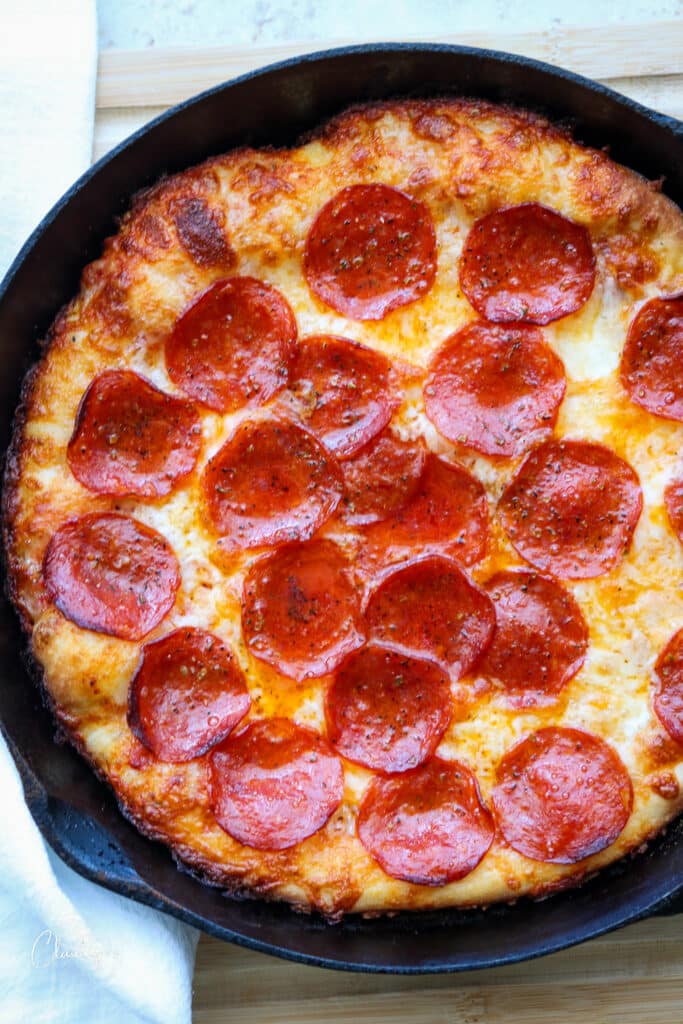
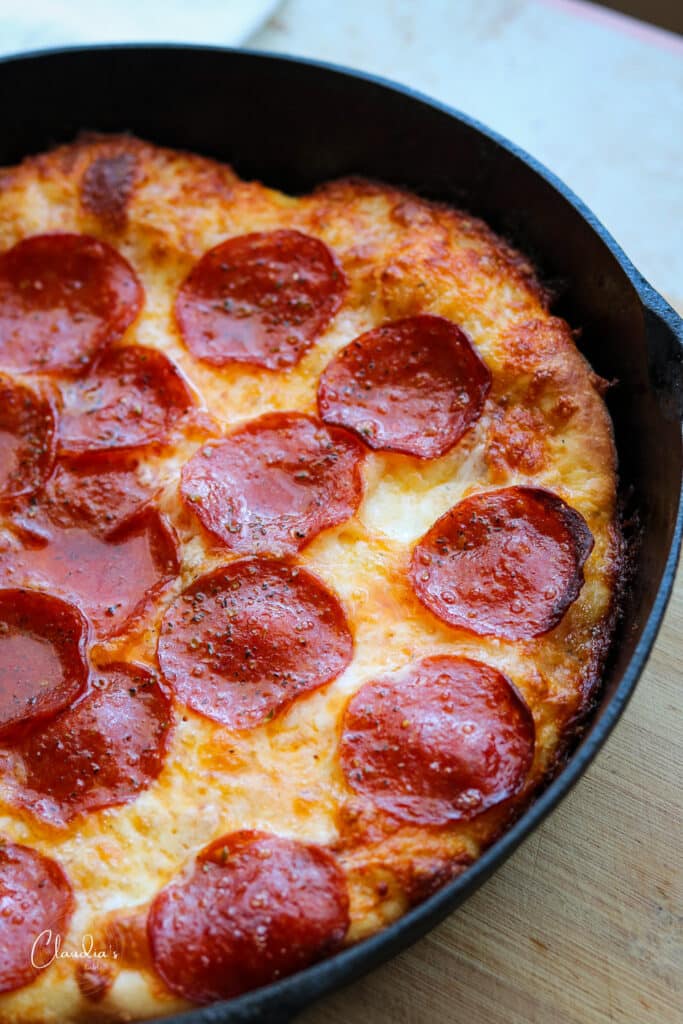
This is an optional step but I recommend it: spray or brush a little olive oil onto the dough, and sprinkle Italian seasoning onto the dough. Spoon pizza sauce onto the dough to the edges. Add plenty of cheese to the top and edges of the pizza dough and top with pepperoni and optional toppings. Now place back into the hot oven or grill for 10 or 12 minutes. The pizza will be baked when it’s puffy, and crispy and the cheesy edges are golden brown. Yum!
If you are baking the pizza on a gas grill, just ensure that the grill heat is about 500 degrees Fahrenheit. Most grills have thermometers so you can gauge the heat well and not second guess.
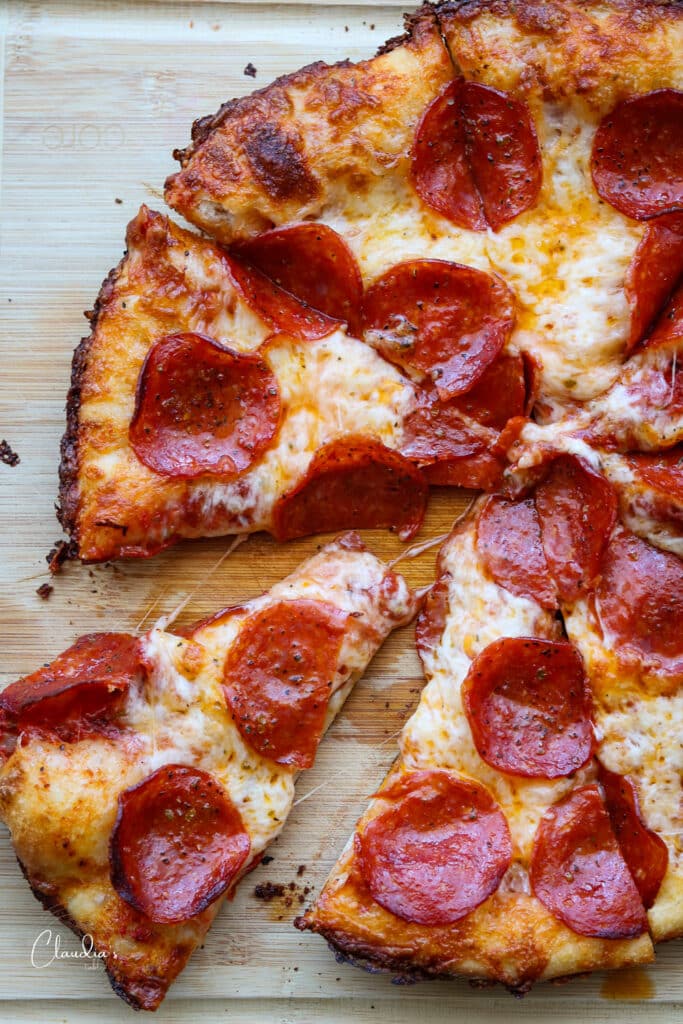
Once the pizza is baked, carefully slide out the pizza onto a cutting board. Use a metal spatula to loosen the sides of the pizza before sliding it onto a cutting board. Cut the pizza into 6-8 slices using a pizza cutter or a long butcher’s knife.
Suggested toppings for cast iron pan pizza
For me, the classic, cheese and pepperoni are perfect for this Cast Iron Pan Pizza but my husband prefers a “combo” style pizza with cooked Italian sausage, peppers, onions, olives, and pepperoni. I recommend slicing all the vegetables thin so they cook at the same time along with the pizza. Alternatively, I like to sauté the veggies before adding them to the pan pizza so I don’t have to worry about undercooked peppers and onions.
Frequently asked questions
No. I suggest using pizza dough for this recipe. You will want to ensure that the pizza dough reaches the edges of the pan to deliver crispy edges and the puffing of the dough that happens in the baking process.
You can make 3, 10-inch cast iron pan pizzas from my pizza dough recipe.
Yes, so the pizza crisps and is easy to lift out of the pan. I don’t recommend butter or cooking spray. Olive oil is best.
If you allow too much time in between baking the pizzas, it’s recommended to preheat the pan for a few minutes before baking the second batch. If you are baking one pizza after another, you should be fine without reheating the cast iron pan again. Just ensure there is enough oil brushed onto the pan for each pizza.
If you tried this recipe, please help other readers by commenting below and sharing some stars! We 🫶🏼 appreciate you!
All content and photographs ©Claudia’s Table and claudiastable.com

Cast Iron Pan Pizza
February 7, 2024
Equipment
- 1 cast iron skillet 10 inch
Ingredients
Cast Iron Pan Pizza
- 1 dough ball homemade Perfect All Purpose Pizza Dough Recipe or store-bought refrigerated pizza dough.
- 1/2 cup of pizza sauce store-bought or my Rich and Zesty pizza sauce.
- 1 1/2 cups of mozzarella cheese
- 3-6 ounces of pepperoni sliced
- olive oil to brush onto dough + olive oil to brush onto pan
- 1/2 teaspoon of Italian seasoning, dried optional
Additional toppings (optional)
- Additional toppings of your choice – cooked Italian sausage thinly sliced, sautéed peppers, onions, sliced olives, mushrooms etc.
- Parmesan cheese grated for serving
- Crushed red pepper flakes for serving
Instructions
Prepare the dough
- Once you have either made your homemade dough (see note below) or purchased prepared dough, (like Trader Joe's refrigerated dough) it's time for a stretch.
- If the dough is refrigerated, allow the dough to come to room temperature before stretching the dough. Dust the work surface with a little flour to prevent the dough from sticking. In terms of size, If you are using a 10-inch skillet, you will want to stretch the dough to a circle slightly larger than the bottom of the pan. The dough should be an 11-inch circle.
- Don’t worry if the circle isn’t perfect, once it’s placed in the pan and baked it will be fine. For this cast iron pan pizza you will not need cornmeal to dust a pizza peel as the dough will go directly into a heated, oiled pan.
- NOTE: If you are using my pizza dough recipe, you will need 1/3 of the dough per pan pizza.
How to prep the cast iron pan to bake pizza
- For the best results, preheat grill or oven to 500 degrees Fahrenheit.
- Once the oven is preheated, place the empty cast iron pan in the middle rack or grill and preheat for 10 minutes.
- Using an oven-safe mitt, carefully remove the preheated cast iron pan and carefully brush olive oil on the bottom and sides of the skillet.
How to bake Cast Iron Pan Pizza
- Now carefully place the dough circle in the pan and carefully push the edges if needed to even it out the dough on the bottom of the skillet.
- OPTIONAL: Spray or brush olive oil onto the dough, sprinkle Italian seasoning onto the dough.
- Spoon pizza sauce onto the dough to the edges.
- Add plenty of cheese to the top and edges of the pizza dough and top with pepperoni.
- Now place back into the hot oven for 10 or 12 minutes.
- The pizza will be baked when it’s puffy, crispy and the cheesy edges are golden brown. Yum!
- Once the pizza is baked, carefully slide out the pizza onto a cutting board. Use a metal spatula to loosen the sides of the pizza before sliding it onto a cutting board. Cut the pizza into 6-8 slices using a pizza cutter or a long butcher's knife.
Nutrition
Nutritional information is calculated online and should be used as a guide.
All content and photographs ©Claudia’s Table and claudiastable.com
Looking at the picture has me wanting to make this pizza, looks so good. I am concerned about the instruction to preheat the cast iron skillet, then adding the raw dough. Trying to get the dough properly centered in that blazing hot pan seems precarious at best. I wonder what you think of doing it a different way. Start with a cold cast iron skillet, adding some olive oil to the pan then add the dough then the toppings and cook it atop the stove to brown the bottom, giving the pizza a jump start, and finishing in the oven. Seems like a less dangerous method. I’d be interested in your thoughts.
Hi Pat,
I think your suggestion is great. Please let me know how it works out!
Hi, I log on to your blog on a regular basis.
Your writing style is awesome, keep doing what you’re doing!
For the hot cast iron, you can put everything in first, then heat it on the stove to crust up the bottom and sides…then place in the oven.
Thanks for the tip KJ!